

How To Repair O Ring On Sink
How to Fix a Leaky Faucet
Fix a dripping kitchen faucet with replacement parts.
![]() Time
Time
An hour or less
![]() Complexity
Complexity
Beginner
![]() Cost
Cost
Less than $20
Introduction
You lot can fix almost any drippy single-lever kitchen faucet in about an hr. Nosotros'll testify you how. The repair is a lot easier than you might think, fifty-fifty for a plumbing novice.
Tools Required
Materials Required
- Faucet repair kit
- O-ring seals
Doing your own faucet repair may seem daunting, but once you learn the nuts, modernistic faucets are fairly easy to repair. In fact, the hardest stride to fix a leaky faucet is usually finding the right replacement parts. In this article, nosotros'll tell you lot how to discover replacement parts and show you how to cease spout drips on the three main types of single-lever faucets: rotary ball, cartridge and ceramic disc. We're showing kitchen faucets and kitchen faucet repair for a dripping faucet, but you lot can fix most unmarried-lever bathroom faucets using the same procedures. We'll also show yous how to stop leaks around the base of the spout and fix leaking faucets.
The tools you'll need for this how to fix a leaky faucet projection vary a little depending on the faucet you're repairing. Yous'll probably demand an Allen wrench to remove the handle. Buy a set of small Allen wrenches and you lot'll be prepared for all kinds of leaking faucets. Near repairs as well require screwdrivers and a pair of large slip-joint pliers.
Project step-by-step (18)
Stride ane
Rotary Brawl Faucet Anatomy
- The diagram beneath shows the parts and associates of a rotary brawl faucet.
- Note: Nosotros recommend that y'all buy a repair kit that includes the ball, springs, seats and O-rings for the spout, as well as a small repair tool. With this kit, you'll be prepared for well-nigh any repair.

Pace 2
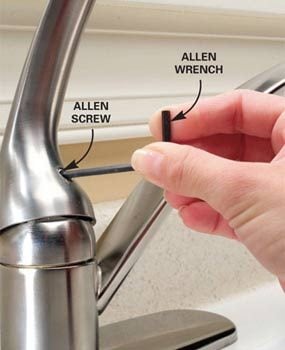
Loosen the Allen Spiral
- Then plough off the water supply to the dripping faucet.
- Lift the handle and pry off the decorative cover to expose the Allen screw.
- Turn the screw counterclockwise until it's loose plenty to lift the handle up from the stem.
- Note: If h2o is leaking out around the base of the faucet handle, you lot may be able to fix the leak by removing the handle and merely tightening the adjusting band slightly. Plow it clockwise with the spanner tool included in the repair kit. If the faucet drips from the terminate of the spout, replace the seats and springs.
![]()
Step 3
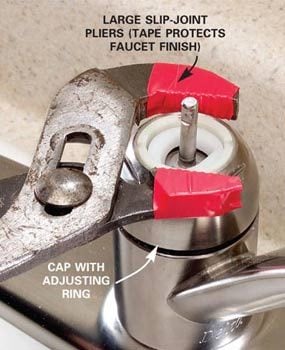
Remove the Cap
- Unscrew the cap by turning it counterclockwise with a skid-joint pliers.
Footstep 4
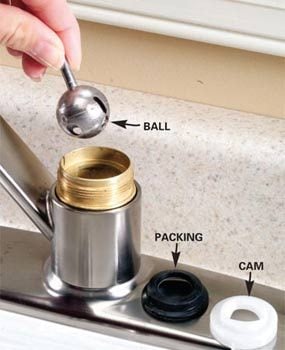
Remove the Rotary Ball
- Lift off the plastic cam and packing.
- Lift out the ball and inspect it.
- Replace the ball if it's scratched, cracked or visibly worn.
Stride 5
Remove and Supercede the Seats and Springs
- Lift out the two rubber seats and springs with a screwdriver.
- Driblet the new springs in the recesses and press the new rubber seats over the peak with your fingertip.
- Marshal the groove in the ball with the pin in the socket and drib the ball in.
- Align the lug on the plastic cam with the notch in the valve body and set it over the ball.
- Thread on the cap with the adjusting ring and tighten it with the slip-joint pliers.
- Turn on the water to cheque for leaks.
- Pro tip: If water leaks from around the brawl stem, use the spanner tool to tighten the adjusting ring until the leak stops.
- Replace the leaking faucet handle and you lot're done.

Follow These Nuts for All Faucet Repairs
Earlier you start, examine the dripping faucet closely to determine where the water is coming from. Leaks around the base of operations of the spout require a different repair than a drip from the terminate of the spout.
Then turn off the water supply to the dripping faucet. You'll probably find shutoff valves under the sink. If those valves don't work or if you lot don't accept any, you'll have to close the main water valve to your entire domicile. After y'all turn off the water, open the faucet in the center position to relieve water force per unit area and make sure the water is shut off. Finally, cover the sink bleed holes with strainer baskets or rags to avoid losing pocket-size parts downward the drain.
Pay close attention to the gild and orientation of parts as y'all remove them. A digital photographic camera or video photographic camera is handy for recording each pace in case yous forget. For easier reassembly, set the parts aside in the order they were removed. When all the parts are out, audit the interior of the valve for bits of deteriorated gaskets or mineral deposits. Use a material or fine nylon abrasive pad to clean the surface. Loosen mineral deposits by soaking them in vinegar.
Slow h2o flow can be caused by plugged holes in the faucet body. Use a modest screwdriver or penknife to clean them out. Before you supersede worn parts and reassemble the faucet, concur a rag over the dripping faucet and open up the water shutoff valve slightly to flush out debris that may have been loosened during the cleaning and inspection.
Afterwards the faucet is reassembled, open the faucet to the eye position and gradually open the shutoff valves to turn on the water. Go out the faucet open until water flows freely and all the air is out of the pipes. If the water flow through the faucet is tiresome, the aerator may be plugged. Unscrew the aerator and clean it out.
Take the One-time Parts to the Shop to Observe Replacements
You'll often detect the brand name stamped on the faucet. And this information will help when it comes time to notice repair parts. Only in most cases, the safest bet is to have the worn parts to the store with you.
If y'all have a Delta or other rotary ball faucet, y'all're in luck because you lot'll notice repair kits in near hardware stores and home centers. Cartridges and repair kits for Moen "cartridge type" faucets are too readily available. But if you lot take another brand or a disc-blazon faucet, you may accept to order parts, since there are too many variations for nigh stores to keep in stock. It helps to know the faucet's model name or number when searching for a replacement cartridge. Otherwise, accept the cartridge with y'all to the store and then you lot can lucifer it to a photograph in the parts catalog.
Plumbing supply specialists are besides a skillful source of repair parts. If you're having problem finding parts, call the manufacturer of your faucet for assistance.
Cartridge-Style Faucet Anatomy
- Cartridge-style faucet parts and associates.

Stride half dozen
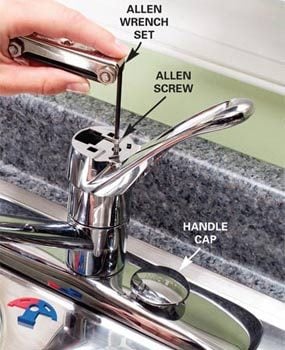
Remove the Allen Screw
- Gently pry off the handle cap with a knife.
- Turn the Allen screw counterclockwise to remove it and elevator off the handle.
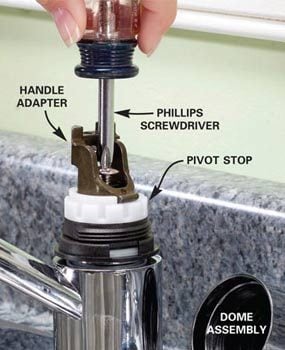
Step 7
Remove the Metal Handle Adapter
- Unscrew the dome assembly under the handle.
- Unscrew the metal handle adapter and lift it off.
- Elevator off the plastic pivot stop.
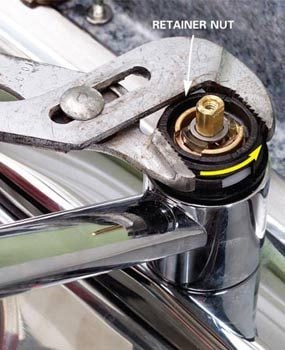
Step 8
Take Out the Retainer Nut
- Remove the retainer nut past turning it counterclockwise with big slip-joint pliers.
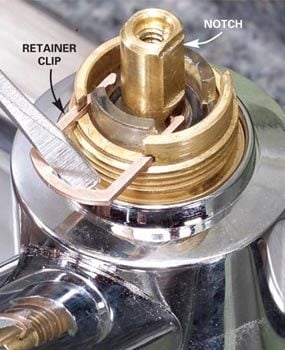
Step ix
Remove the Retainer Clip
- Pry out the brass retainer clip with the tip of a screwdriver.
- Grab the prune with pliers and pull it the rest of the fashion out to avoid losing it.
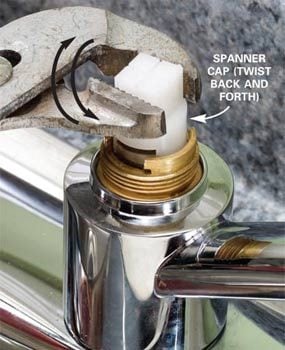
Pace ten
Twist Loose the Cartridge
- Loosen the cartridge by slipping the plastic spanner cap (included with the new cartridge) over the cartridge and twisting it dorsum and forth.
Step eleven
Supplant Worn Parts and Reassemble the Faucet
- Grab the cartridge stalk with pliers and pull it direct upward and out.
- Replace worn parts.

Step 12
Reassemble the Faucet
- Reassemble the faucet in the reverse order.
- Pull the stem up before inserting the cartridge.
- Note: You may have to twist the cartridge slightly to line it upward for the brass retainer clip.
- Use the plastic spanner cap or the tips of needle-olfactory organ pliers to rotate the cartridge.
- Slide the contumely prune into the slots in the valve torso to hold the cartridge in identify.
- Look for the pocket-sized notch on top of the stem and rotate the stem until the notch faces you.
- Install the remaining parts and reattach the handle.
- Note: The directions that come with the stem will assist orient yous hither.
- Exam the faucet.
- Note: If the hot and cold water are reversed, simply remove the handle, dome assembly and handle adapter and rotate the stem 180 degrees.
All Nearly Cartridge-Manner Faucet Repairs
Many faucet brands use a cartridge of some type. Here we evidence how to supersede a Moen cartridge, but the process is similar for other brands. To stop drips at the spout or correct problems with hot and cold mixing, remove the cartridge and either replace the O-rings on the cartridge if they're worn or supervene upon the unabridged cartridge. Accept the cartridge to the dwelling center or hardware store to detect a replacement.
Replacement cartridges for Moen faucets include a plastic spanner cap that allows you to twist and loosen the cartridge to make information technology easier to pull out. Don't be surprised if the cartridge seems stuck. It may take considerable force to pull it out. Actually stubborn cartridges may crave the use of a special cartridge-pulling tool.
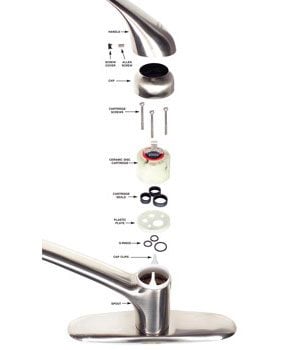
Ceramic Disc Faucet Anatomy
- Parts and assembly of ceramic disc faucets.
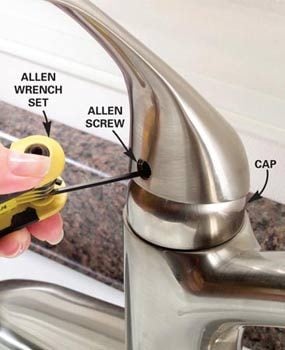
Step thirteen
Unscrew the Handle
- Pry off the decorative screw embrace with your fingernail or the tip of a knife.
- Unscrew the handle screw by turning it counterclockwise with an Allen wrench.
- Lift off the handle.
- Unscrew or unclip the cap.
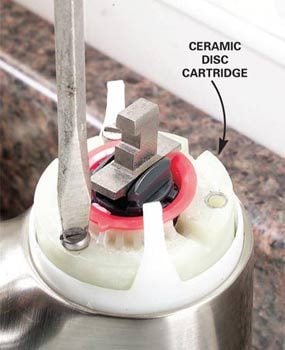
Step 14
Remove the Disc Cartridge
- Remove the screws that concord the disc cartridge to the faucet body and lift out the cartridge.
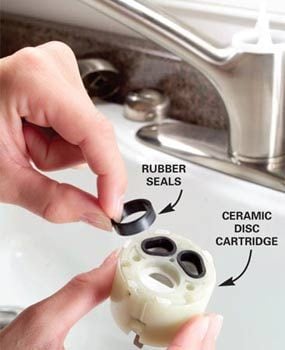
Stride 15
Replace the Seals in the Cartridge
- Inspect the cartridge for mineral buildup and carefully make clean information technology out.
- Then replace the safety seals on the underside.
Step 16
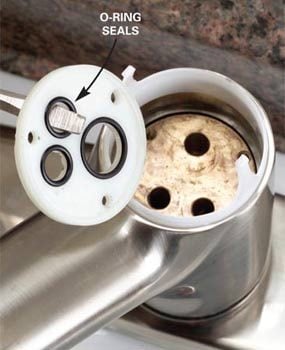
Replace the O-Ring Seals
- Elevator out the plastic disc (on some faucets) and replace the O-rings under it.
- Inspect the holes in the faucet body and make clean them out if they're chock-full.
Ceramic Disc Faucets 101
Ceramic disc valves are simply another type of cartridge. Discs inside the cartridge command the water period. This type of valve is sturdy and reliable and rarely needs fixing. In fact, many manufacturers offer a lifetime guarantee on the cartridge. If yours is damaged, check with the manufacturer to run across if information technology's covered by a warranty.
Leaks can result from faulty condom seals or a cracked disc inside the cartridge. Since it's difficult to spot a cracked disc, and disc cartridge replacements are very expensive, it'due south all-time to start by replacing the seals and reassembling the faucet. Then if the faucet still leaks, remove the disc cartridge and take information technology to the store to order a replacement.
Early on versions of ceramic disc faucets may be more than fragile and can crack if subjected to a blast of pressurized air. That'due south why information technology'south important to leave the faucet open equally yous turn the water back on. This allows air trapped in the lines to escape. When the water runs smoothly, information technology'due south safety to plough the faucet off. Manufacturers take improved the strength of ceramic discs on newer faucets to withstand air blasts, as well as annoying debris that may get dislodged from the within of pipes.
Stride 17
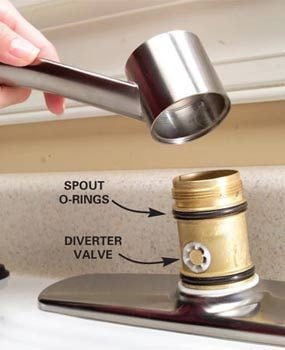
Repair a Spout Leak
- Remove the handle and cartridge.
- Twist and pull up on the spout to remove information technology and expose the O-ring seals.
- Pro tip: The diverter valve controls h2o to the sprayer. Their appearance varies considerably among brands, but you'll unremarkably notice them under the spout. If your sprayer isn't working properly, first clean it in vinegar or simply replace it. If this doesn't work, the diverter valve may be clogged. If it doesn't simply pull out, contact the manufacturer or ask a knowledgeable salesperson for assistance with cleaning information technology.
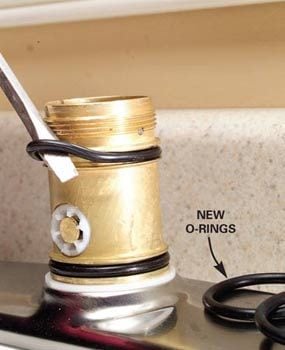
Stride xviii
Supplant the O-Rings
- Skid the tip of a screwdriver under the O-rings to slide them out of the groove.
- Install the new O-rings and lubricate them with plumber'southward grease.
- Reinstall the spout.
Leaky Spout Basics
Leaks around the base of the spout are acquired by worn O-rings located under the spout. All that's ordinarily required to access these O-rings for replacement is to wiggle and pull upward on the spout to remove it.
Depending on the dripping faucet, you'll also have to remove the handle and other parts to access the spout. Be persistent. The spout may be a petty stubborn. Spout O-ring kits are bachelor for many faucets, or you tin have the old O-rings to the hardware store or plumbing supply store and match them up with new ones. Remember to pick up a small toothpaste-type tube of plumber'south grease while you're at that place.
Additional Information
- Figure A: Ball faucet parts
- Figure B: Cartridge faucet parts
- Figure C: Ceramic faucet parts
Originally Published: November 30, 2022

How To Repair O Ring On Sink,
Source: https://www.familyhandyman.com/project/how-to-repair-a-kitchen-faucet/
Posted by: esparzaopithought.blogspot.com
0 Response to "How To Repair O Ring On Sink"
Post a Comment